-
-
While it's actually difficult to get your fingers under the thing during operation, the blade is intentionally sharp and can draw blood.
-
Especially when changing cutters be aware of the location of the blades.
-
-
-
Control Panel: Manually moves the carriage, advance the medium, adjust settings, etc.
-
Carriage: Moves the blade holder along the X axis.
-
Blade Holder: Suspends replaceable blades for cutting the vinyl, etc.
-
Pinch Roller: Holds the vinyl (or other cuttable media) tightly to the feed roller below.
-
Emergency Stops: Used to automatically stop the machine from cutting (to avoid damage) when improper cutting parameters are set, or in the event of software errors.
-
-
-
Pinch Roller Release Levers: Can be released by pressing down on the Release Levers. Pinch rollers should be adjusted so that one is positioned on each side of the vinyl /media to be cut and should only be lowered onto an area of the feed roller below that has traction (the rough area).
-
Media Holder: Place the roll of vinyl (or other media) on the wheels so it can easily feed into the machine.
-
-
-
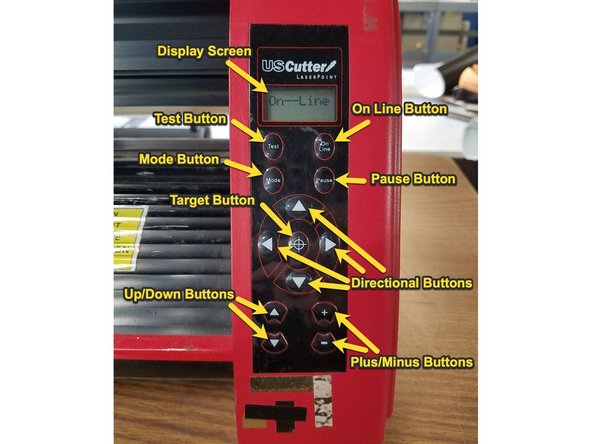
Display Screen: Shows the current Mode/Status of the Cutter
-
Test Button: Cuts a test square
-
On Line Button: Toggles between On Line/Off Line modes
-
Mode Button: Cycles through the different adjustment modes of the cutter; Jog, Pressure setting, Test mode, Repeat mode, Cut Speed setting, X Axis scale compensation, Y Axis Scale compensation
-
Pause Button: Pauses cutting
-
Directional Buttons | Up/Down Buttons: (Only In Jog Mode) Moves Blade Position/Rollers | Moves the Blade in and out of the fully Down Cutting Position
-
Target Button: (Only In Jog Mode) Resets origination point of Blade/Rollers to the current settings
-
Plus/minus Buttons: Adjusts the settings throughout the different Modes
-
Almost done!
Finish Line


