Difficulty
Moderate
Steps
9
Time Required

User-Contributed Guide
This guide is not managed by the site's staff.
Quiz
0
Introduction
Standard Operating Procedure (SOP) for Setting Up and Using an Oxy-Acetylene Cutting Torch
Purpose
To ensure safe and correct setup, use, and shutdown of an oxy-acetylene cutting torch for cutting metal.
Scope
This SOP applies to all personnel who are trained and authorized to operate an oxy-acetylene cutting torch.
-
-
• Safety goggles or face shield with suitable shade lenses for eye protection • Flame-resistant gloves and protective clothing • Ear protection if in a noisy environment • Close-fitting, fire-retardant clothing (no loose articles)
-
-
-
• Oxygen cylinder (large cylinder) • Acetylene cylinder (smaller cylinder) • Cutting torch with dual hoses (oxygen and acetylene hoses are green and red, respectively) • Regulators for oxygen and acetylene • Spark igniter • Soap solution for leak testing
-
-
-
Initial • Ensure all valves (on the torch and both cylinders) are closed before beginning. • Check that oxygen and acetylene cylinders are properly secured to prevent tipping.
-
Connecting Regulators and Hoses1. Attach the oxygen regulator to the large oxygen cylinder (green). 2. Attach the acetylene regulator to the smaller acetylene cylinder (red). 3. Ensure the regulators are tightly connected but avoid over-tightening.
-
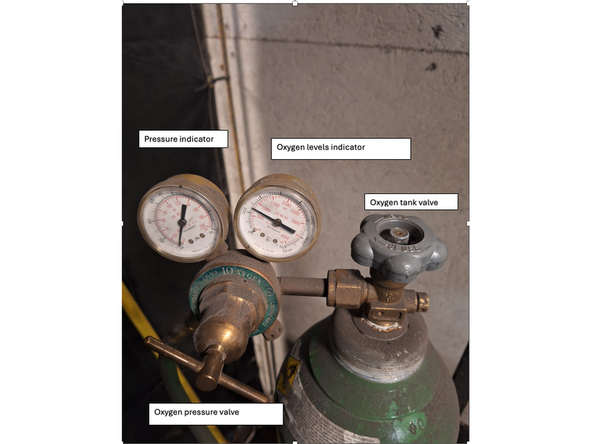
Opening Cylinders 1. Open the Oxygen Cylinder: Turn the valve counterclockwise to fully open. 2. Open the Acetylene Cylinder: o Open the valve no more than a quarter-turn. This allows quick closure if necessary.
-
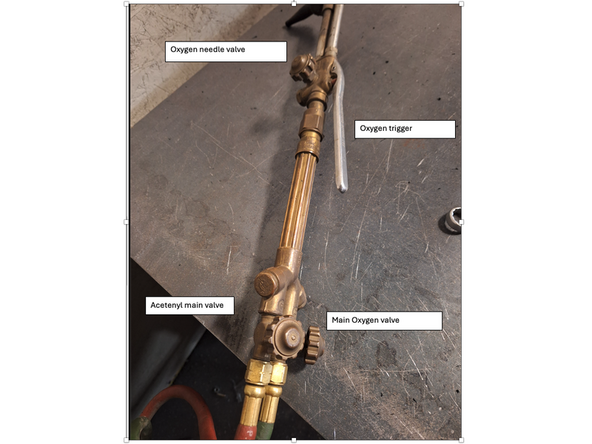
Set Oxygen Pressure:Open the Main oxygen valve on the torch slightly to allow gas to flow, then adjust the oxygen regulator on the tank to reach approximately 20 PSI. Test pressure by momentarily pressing the torch trigger, adjusting if needed.
-
Set Acetylene Pressure: on the Torch, open the main acetylene valve slightly, then adjust the acetylene regulator to around 5-10 PSI.Test and adjust as necessary.
-
Checking for Leaks • Apply a soapy solution to connections and hoses to detect leaks. • Watch for any bubbles, indicating a leak. Tighten connections if needed or replace defective parts.
-
-
-
4.1. Open the Torch Oxygen valve all the way.
-
4.2Igniting the Acetylene 1: Open the acetylene valve slightly on the torch. 2. Use the spark igniter to ignite the acetylene gas. A sooty, smoky flame will appear. 3. Gradually open the acetylene valve until the flame feathers slightly with minimal soot.
-
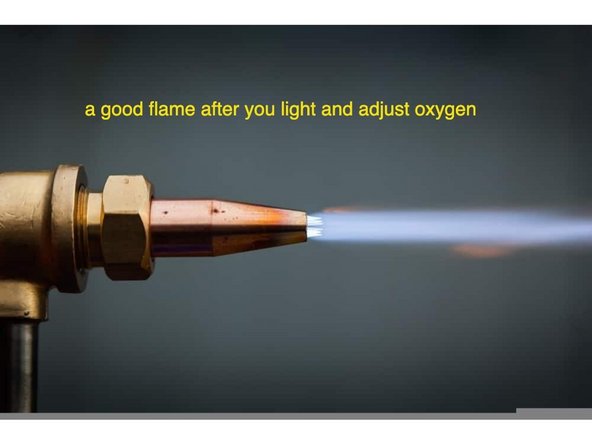
4.3 Adding Oxygen 1: Slowly open the oxygen needle valve on the torch until a sharp inner flame appears. 2. Adjust until there are three distinct flames (the preheat flames), with the inner flame meeting the middle flame. 3. Test flame by pressing and releasing the Oxygen Trigger torch lever; adjust as needed.
-
-
-
1. Position the torch tip close to the metal surface. 2. Preheat the metal by holding the inner flame tips until the metal glows red (cherry hot). 3. Depress the torch lever to release a concentrated stream of oxygen, initiating the cutting process. 4. Move the torch steadily along the cut line to achieve a clean cut.
-
-
-
Extinguishing the Flame 1.Close the acetylene valve on the torch first to extinguish the flame. 2. Close both the oxygen needle valve and the main oxygen valve on the torch.
-
6.2 Closing Cylinders: 1.Close the acetylene cylinder valve completely. 2. Close the oxygen cylinder valve completely.
-
6.3 Releasing Pressure from the Hoses 1. Open both torch valves (oxygen and acetylene) to release any remaining gas. 2. Once pressure is fully released, close the torch valves. 6.4 Backing Off Regulator Valves
-
6.4 Backing Off Regulator Valves • Turn regulator adjustment knobs counterclockwise to fully back off (close) both oxygen and acetylene regulators.
-
-
-
1. Store cylinders in an upright, secured position, away from heat and flammable materials. 2. Inspect hoses, regulators, and connections regularly for wear or damage. 3. Check for leaks periodically, especially after any reconnection or adjustment.
-
-
-
• Always start with acetylene when lighting and turn off acetylene first when extinguishing. • Use soapy water to detect leaks, and do not use the equipment if leaks are detected. • Never attempt to cut metal in enclosed or poorly ventilated spaces due to the risk of gas buildup and potential explosion.
-
-
-
• Low Flame or Poor Cutting Performance: Check for sufficient oxygen and acetylene pressure.
-
• Hose Bursts or Leaks: Check all connections, close tanks immediately, and perform a thorough inspection.
-
• Torch Doesn’t Light or Stay Lit: Ensure adequate acetylene flow, or check for clogged tips.
-