Difficulty
Moderate
Steps
10
Time Required
- Rug Tufting Station 10 steps

User-Contributed Guide
This guide is not managed by the site's staff.
Quiz
0
-
-
The best canvas to use is a cotton or cotton/poly blend Monk's Cloth. It is possible to use other open weaves such as burlap, but they rip easily and don't hold up as well.
-
A lot of yarn is used for each rug created. We prefer worsted weight yarn, held double. Wool or acrylic is acceptable, but look for a smooth yarn without much texture or variation.
-
The next slide helps with calculations on yarn needed and yarn setup.
-
Rug Glue is used to seal the back of the work. We have a shared bucket of rug glue in the space for your use.
-
-
-
Worsted weight yarn held double is best for rug tufting.
-
This process uses A LOT of yarn. A rough estimate for a 12"x12" portion of rug is:
-
1.6 regular sized (264yd) skeins of worsted weight
-
1 large sized (814yd) skeins of worsted weight. These are usually sold as 1 lb of yarn.
-
There are some good calculators out there for determining how much yarn you will need: https://www.tuftingtutorials.com/tufting... and https://www.tuftlab.app/
-
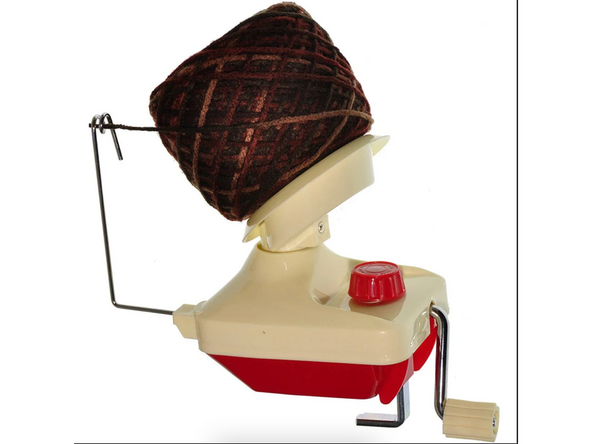
Pre-wound yarn works best. Use the yarn ball winder to first wind a ball of yarn. Then take the outside and inside ends of that yarn, and rewind the ball so that it is doubled.
-
-
-
Pick or create an image
-
Pick a desired finished size
-
Cut the canvas
-
This needs to be bigger than the frame you use. Cut your canvas to be 6” wider and taller than the frame you use
-
Mount the frame to the table with two the two clamps dedicated to the Tuft Stuff Area, the frame should be flush with the edge of the table
-
You can also use the french cleats to attach the frame to the wall.
-
Make sure the metal eye is facing you and is on the top of the frame.
-
-
-
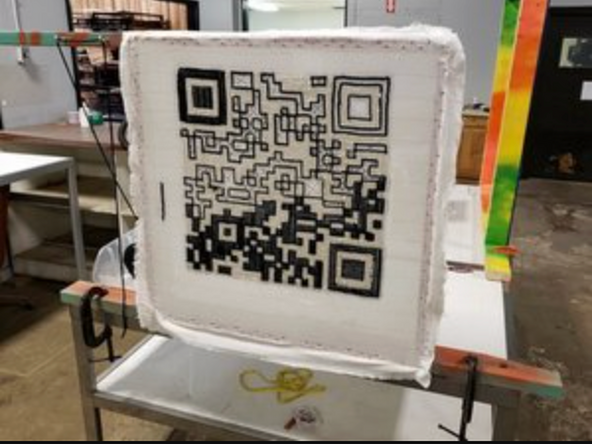
Starting at the top of the frame, hang the canvas onto the carpet tack strip
-
Make sure you have roughly 3” above the carpet tack strip, and three inches overhanging to the left and right
-
Make sure the fabric is straight. The grain should be parallel to the top of the frame
-
Pull the canvas at the bottom center, and snag it on the bottom carpet tack, then work from center out for the rest
-
Same technique, stretch the canvas on the left and right sides of the frame
-
Continue to stretch the canvas around the frame, working around and pulling taught at least 3 times. We are looking for a even, tight tension across the whole canvas.
-
-
-
Remember to Mirror your image!
-
If you’re doing free hand, draw your image, with a sharpie, and skip to Making the Rug
-
You may also want to use the projector. Bring a computer or attach a USB, center your design on the canvas.
-
Print the image on the HP plotter behind the front desk. Use painters tape to adhere your image, good side to finish side, and trace the image
-
-
-
It is always a good practice to turn off the gun when not tufting and during setup. This prevents accidental misfires, which can be harmful.
-
Place your yarn ball in a bowl. Thread through the eyes in the frame.
-
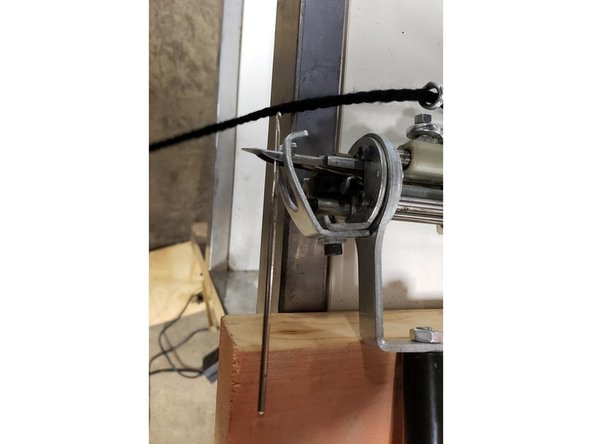
Thread the yarn, back to front, through the coiled eye on the gun
-
Use the crochet hook to pull the yarn through the eye of the needle from top to bottom.
-
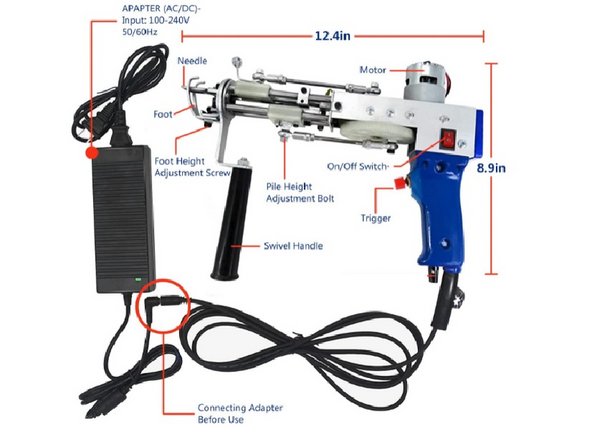
Set the speed dial to the slowest setting to start, you can adjust this as you work.
-
-
-
Turn gun on, rocker switch on the grip
-
Press the feet of the gun into the fabric until the fabric is completely taught, then push a little more.
-
Make sure that the gun is perpendicular to the fabric, any variation makes it more likely that the yarn will not catch.
-
The gun will pull itself in the direction the foot is facing while tufting. The operator should not “push” the gun in any direction, or the machine will fail. The gun will skip / jump if not pressed into fabric firmly enough. As fabric loosens, you may need to press more firmly over time, or readjust the fabric on the frame.
-
Pull the trigger. The gun will feed forward at a pretty consistent speed. It will want to follow the grain of the fabric
-
Let go of the trigger and pull the gun away from the fabric when you want to stop tufting
-
Start with detail work, like fine points and lines
-
When filling in an area, work in straight lines for the best result.
-
-
-
Rug glue is used to seal the back of the work to make sure that no yarn pulls out during use.
-
Use scissors to trim the tails close to the canvas. Be gentle, you can accidentally pull the yarn free.
-
Use plastic mud knives to apply carpet adhesive/rug glue to the tufted areas. Coat as thinly and evenly as possible.
-
This will take 1-2 days to set/cure. Leave it flat
-
Take the canvas off the frame, use scissors to cut roughly two inches around the rug
-
Cut notches in raw edge about every 3", more on rounded edges. Apply a backing fabric to the glue, and secure the cut notches beneath it.
-
-
-
Once the work is sealed, take your rug off the frame, lay it flat, and trim all of the fibers flat.
-
We have modified a hair clipper for this purpose.
-
Be sure to use a vacuum as you are trimming to keep dust down.
-
You may use a pair of scissors to trim along color changes to boost contrast.
-
Marvel at what you've created!
-
-
-
Canvas- The fabric you’re using for your rug base. Usually it’s something with an open weave, like monks cloth or burlap
-
Backing- Fabric of material used to finish the rug. This can be utility fabric, like hobnob, felt, leather
-
Pile- refers to the fibers on the finished side of the rug
-
Skein- Yarn wound in an oblong shape. This is how it often comes from a craft store, like Michael's.
-