Difficulty
Easy
Steps
3
Time Required
00:03:00

In Progress
This guide is currently being written. Reload periodically to see the latest changes.

User-Contributed Guide
This guide is not managed by the site's staff.

Private
This guide will not appear in search results and can only be viewed by team members!
Quiz
0
Introduction
The process to set the Z origin manually with a sheet of paper is described in the guide 03 - Set The User Origin. This guide describes how to use the tool sensor to automatically probe and set the Z origin using a custom macro program.
-
-
Where you place the sensor depends on how your CAM program is set up. Ususally this will be the machine spoilboard surface or the top surface of your material.
-
Find a clear flat spot to place the sensor.
-
Try to avoid areas that have been machined or damaged.
-
Place the sensor flat on the surface. Make sure it sits level and does not rock back and forth.
-
Use the steel plate to hold it in place so it does not shift during probing.
-
-
-
Use the manual controls on the "Axes + Spindle" screen to move the tool close to the sensor.
-
Activate the handwheel jog mode.
-
Use the handwheel to position the tool over the center of the tool sensor, and within 1in of the top surface.
-
-
-
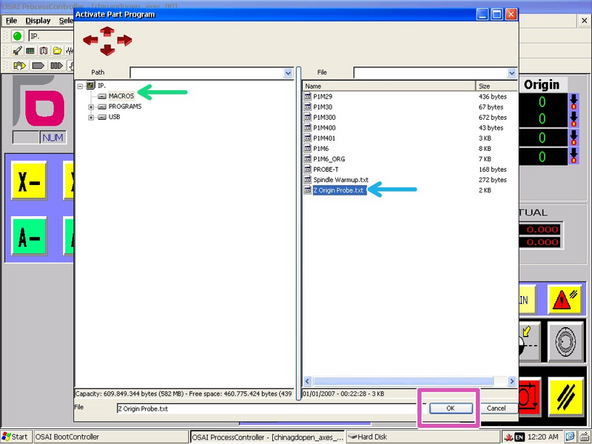
In the toolbar, click "Part Program."
-
Click "Activate Part Program"
-
In the window, browse to the "Macros" directory.
-
Select the "Z Origin Probe" program.
-
Click "OK" to activate the program.
-