Introduction
The process to set the Z origin manually with a sheet of paper is described in the guide 03 - Set The User Origin. This guide describes how to use the tool sensor to automatically probe and set the Z origin using a custom macro program.
The paper method may actually be more precise in setting the origin, but this method is more convenient.
This program will only update the Z origin for (UAO, 1) which is the default origin used by VCarve. If you wish to use a different origin, you could copy this value to that origin.
-
-
Where you place the sensor depends on how your CAM program is set up. Ususally this will be the machine spoilboard surface or the top surface of your material.
-
Make sure the sensor is removed from the 3D printed part that uses magnets to hold it on the reference stud. It should just be the bottom of the sensor itself which sit son the reference surface.
-
Find a clear flat spot to place the sensor.
-
Try to avoid areas that have been machined or damaged.
-
If using "machine bed," find a place close to your stock material, as the height will vary somewhat across its area
-
Place the sensor flat on the surface. Make sure it sits level and does not rock back and forth.
-
Use the steel plate to hold it in place so it does not shift during probing.
-
-
-
Use the manual controls on the "Axes + Spindle" screen to move the tool close to the sensor.
-
Activate the handwheel jog mode.
-
Use the handwheel to position the tool over the center of the tool sensor, and within 1in of the top surface.
-
-
-
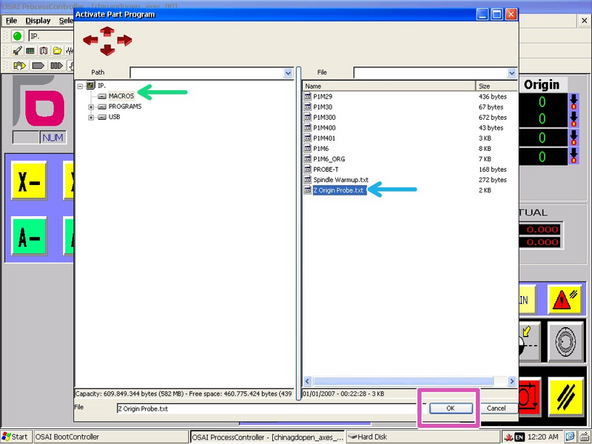
In the toolbar, click "Part Program."
-
Click "Activate Part Program"
-
In the window, browse to the "Macros" directory.
-
Select the "Z Origin Probe" program.
-
Click "OK" to activate the program.
-
-
-
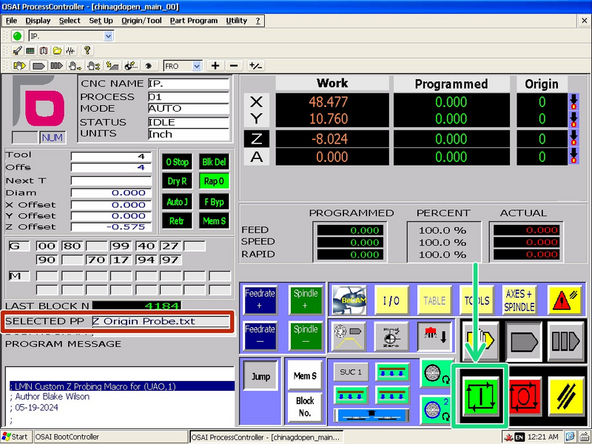
Verify that the program is loaded.
-
Press "Cycle Start" to execute the probing sequence.
-
The Z axis will begin lowering toward the sensor, be prepared to stop the machine if something does not work correctly.
-
The program will trigger the sensor 3 times, with the second two being slower, then update the Z value for (UAO, 1) with the sensor height subtracted from the measured position.
-
To see the updated value, you will have to use the MDI mode to enter (UAO,1) and activate the origin.
-


