Difficulty
Moderate
Steps
5
Time Required
- 03 - Set The User Origin 5 steps

User-Contributed Guide
This guide is not managed by the site's staff.
Quiz
0
Introduction
The origin is the point where X, Y, and Z all equal zero. It is defined in the CAM software, usually at one of the corners of your stock.
- Programs which cut all the way through the material should have their origin set to the machine bed to avoid cutting into the spoil board.
- Programs which do not cut all the way through can have their origin set to the surface of the material to ensure proper cutting depth.
The NewCNC controller refers to the origin as a "User Absolute Origin" (UAO). It will store up to 100 different UAOs in the Origin Table. Here is some info on specific origins:
- UAO 0 - Refers to the absolute coordinates of the machine.
- UAO 1 - The default user origin set by Vcarve.
- UAO 2-96 - Available for member use to overwrite.
- UAO 97 - Corner of phenolic vacuum plenum. Do not use.
- UAO 98 - Rotary axis center line.
- UAO 99 - Corner of top spoil board surface.
- UAO 100- Corner of vacuum spoil board surface.
-
-
Click the "MDI Mode" button to open the manual g-code entry window.
-
Enter "(UAO,xx)" where xx is the origin number you want to activate.
-
Click "Confirm"
-
Click the "Cycle Start/Run" button to activate the origin.
-
Check that the origin number has changed in the right hand column of the coordinates table.
-
-
-
Select the "Axes + Spindle" Screen.
-
Use the axis buttons to jog the machine close to your intended origin.
-
Activate the handwheel control jog mode.
-
Use the handwheel control to fine tune the position of the tool on the X and Y origin you want to set.
-
-
-
Disable the hand wheel by selecting "Continuous Jog Mode"
-
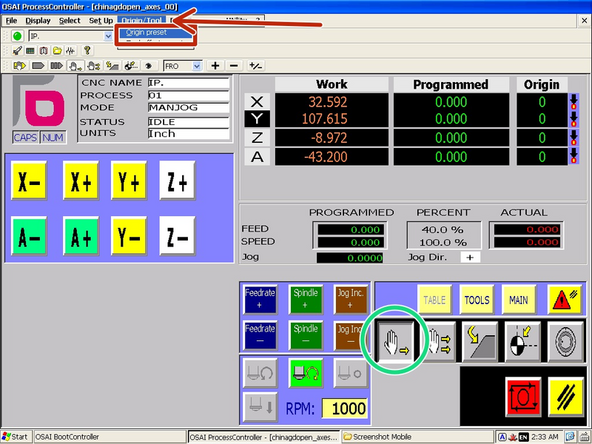
In the top toolbar, click "Origin/Tool" and "Origin Preset"
-
If the toolbar is missing, use Ctrl+M on the keyboard to bring it back.
-
-
-
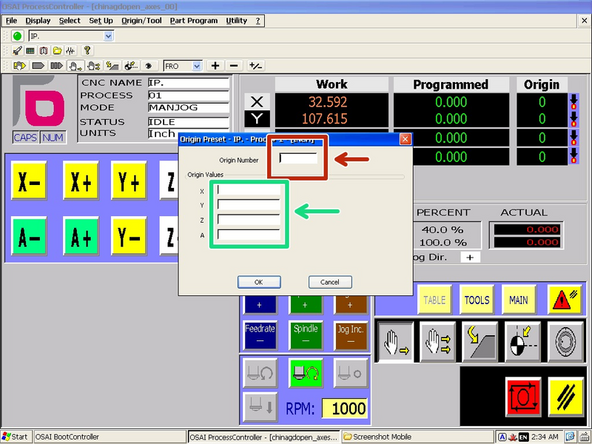
Enter the number of the origin you would like to overwrite (Usually "1")
-
Do not overwrite 96-100. These are preset based on fixed locations on the machine.
-
Enter "0" for X and Y to tell the controller which axes you want to overwrite.
-
This can be performed independently for each axis if desired, by only entering “0” for that axis in the window.
-
-
-
After setting X and Y, Re-enable handwheel mode.
-
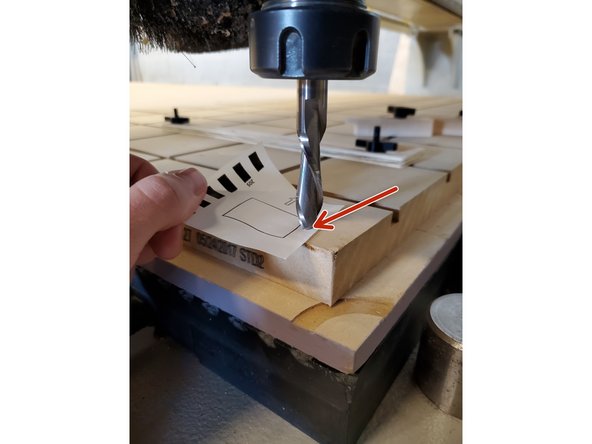
Jog to an open spot on the spoil board or your stock (depending on CAM program origin).
-
Carefully lower the tool in the Z- direction until it just grabs a scrap of paper between the bit and the surface.
-
Repeat Steps 2 and 3, this time entering "0" in the Z axis field.
-